
In today’s fast-paced and data-driven world, understanding Serverless Change Data Capture can help businesses that are constantly seeking efficient and scalable ways to capture and analyse data.
One approach that people respond to is Serverless Change Data Capture (CDC). This powerful technology allows organisations to track and capture real-time data changes across various systems and databases without the need for managing complex infrastructure or provisioning dedicated servers.
In this blog, we will delve into the world of Serverless Change Data Capture, exploring its fundamental concepts, benefits, and use cases. Whether you’re a data engineer, developer, or business professional interested in harnessing the potential of real-time data, this guide will provide you with a comprehensive understanding of CDC and its significance in modern data architectures.
So, let’s dive in and discover how this innovative technology can shape the future of data integration and analytics.
What is Change Data Capture (CDC)?
CDC is a technique used in data management systems to track changes made to data in a database over time. CDC enables efficient data synchronisation between different systems and applications, ensuring that all systems have access to the most up-to-date and accurate information.
It is especially useful in scenarios where it is necessary to keep track of changes to data over time, such as in business intelligence, analytics, auditing, compliance, and data warehousing. Understanding Serverless Change Data Capture makes it easier for organisations to identify and address data inconsistencies, ensure data quality, and streamline data integration across different systems and applications.
According to a white paper published by McKinsey, “CDC is now considered a foundational capability for any modern data architecture, supporting key business use cases such as data integration, analytics, and compliance.” With CDC, businesses can effectively monitor data changes in their applications, systems, and databases, which can provide valuable insights, subsequently leading to improved decision-making.
BigQuery: The role of Google’s powerful data tool
With BigQuery’s powerful ANSI SQL compliant querying capabilities, organisations can gain valuable insights into data changes as they occur. BigQuery’s near-real-time streaming ingestion capabilities coupled with its seamless capability to process CDC stream updates enable organisations to process and analyse data changes immediately as they happen, providing valuable insights that can drive better decision-making.
Furthermore, with its fully-managed cloud-native architecture, BigQuery offers robust security and compliance features, ensuring that the data is protected and meets regulatory requirements.
Another tool that will give you a better understanding Serverless Change Data Capture is Datastream, a fully-managed serverless solution for ingesting and managing data streams in real-time. Datastream simplifies the process of replicating and integrating data across different systems, enabling organisations to capture real-time data changes from databases, applications, and streaming platforms.
Exploring Architecture
Here’s the architecture we are going to implement. The architecture simulates a stream of changed data from AWS RDS instance to Big query.
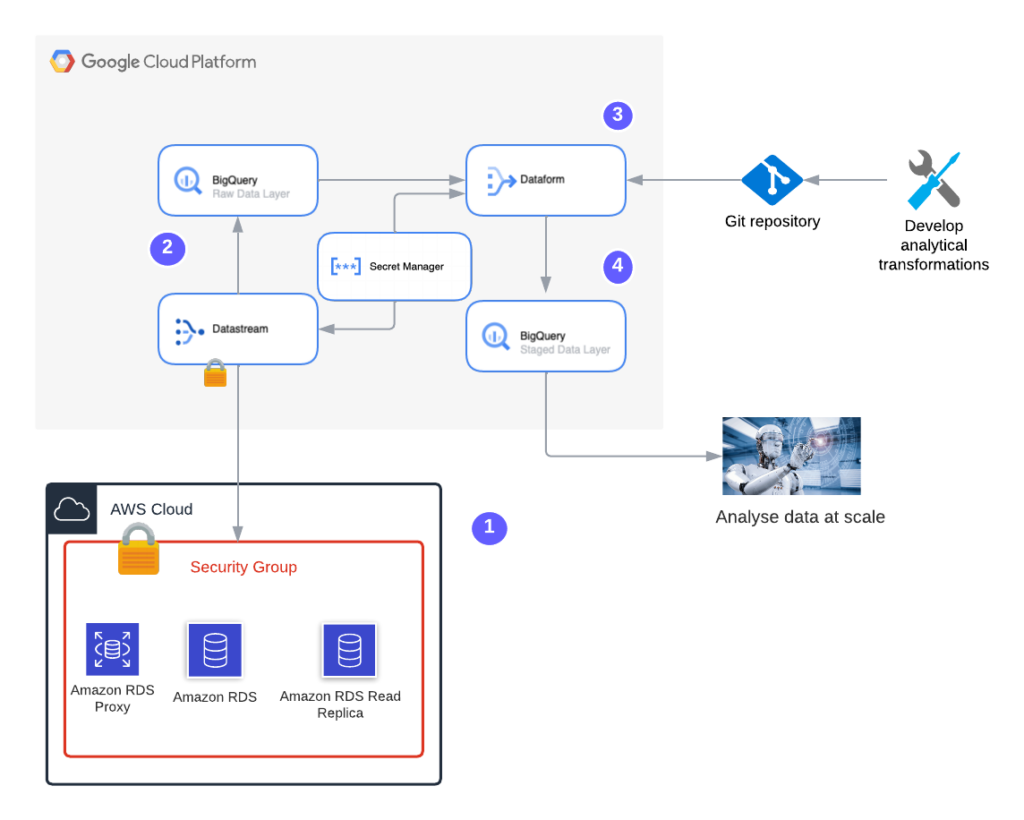
- We will build a Change Data Capture solution for the data generated at transactional database source – RDS (PostGresSQL variant) within the AWS ecosystem.
- Google Cloud Datastream connects securely to the RDS Read replica to stream the raw data into BigQuery’s raw data layer.
- The business transformations are applied by Dataform and the transformed data is loaded to the staging data layer within BigQuery.
Datastream and Dataform extracts secrets from the secrets manager.
- The data in the Bigquery’s staging layer is consumed for analytics at scale.
Secured connectivity between Datastream and AWS RDS
In this demonstration, we’ll use IP allowlist to connect the Datastream to an AWS RDS instance. This feature enables a public connectivity which can be secured with custom or google provided encryption certificate. As an alternative to public facing mechanisms, I strongly recommend using private connectivity, for more secured and production grade implementation.
I use a custom SSL encryption for the connectivity. You can further enhance the encryption and stability of the RDS connection using bastion proxy. You can find the details here.
Doing More with Data
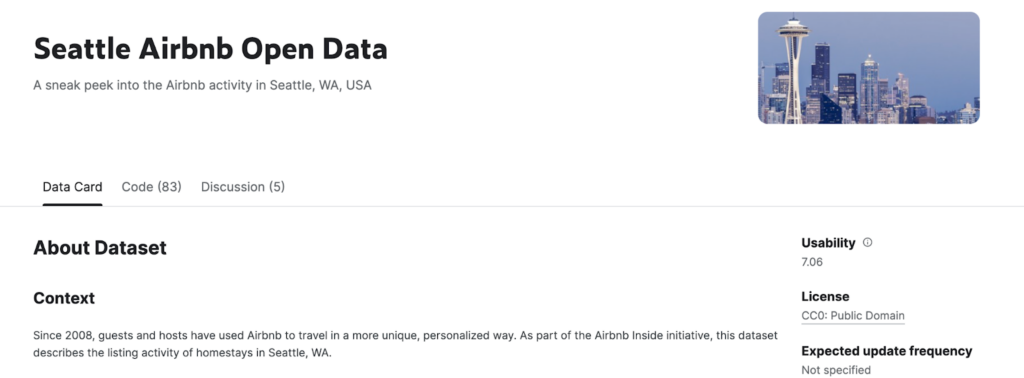
Here, we use Airbnb’s Seattle dataset for the demonstration. The dataset schema and dictionary can be found here.
Enable source (AWS RDS) for replication
The following setup is needed on the AWS RDS to connect the data stream.
- Create a new security group in AWS and add ingress rule (TCP/1521) to the AWS RDS. This will allow the datastream regional service IPs (IP allowlist method) to connect. You can find the details on setting up ingress rules here. Datastream regional IPs are here.
- Create a new parameter group (detailed here) in RDS with the parameter ‘rds.logical_replication’ set to 1. Apply the new parameter group to RDS.
- Create a publication on the database for all the tables , by running the SQL query.
CREATE PUBLICATION datastream_demo_publication FOR
table
  airbnb.reviews,
   airbnb.listings,
airbnb.calendar;
Please note that the above publication rule implies that all those tables in the given schema are replicated. The replication includes INSERTS, UPDATES, DELETE and TRUNCATE. Refer to the link to fine tune this selection. Postgres 15 offers columnar selection.
- Create a replication slot to stream the changes on the postgres database by running the following query
SELECT
PG_CREATE_LOGICAL_REPLICATION_SLOT('datastream_demo_repl_slot', 'pgoutput');- Create a replication user by executing the following query.
CREATE USER datastream_user WITH ENCRYPTED PASSWORD '[password]';- Grant the datastream user with appropriate permissions
GRANT RDS_REPLICATION TO datastream_user;
GRANT SELECT ON ALL TABLES IN SCHEMA airbnb TO datastream_user;
GRANT USAGE ON SCHEMA airbnb TO datastream_user;
You can look at general restrictions on the postgres logical replication here
Time to Enable the Datastream
Enabling datastream involves 3 stages:
a) Define a source connection profile , in this case profile for AWS RDS instance.
b) Define a destination connection profile, in this case for BigQuery.
c) Using the above connections, define the stream and start the stream.
source_config.json – Set up the following file in your project working directory. You can give any name to the file.
{
   "includeObjects": {
     "postgresqlSchemas": [
       {
         "schema": "airbnb",
         "postgresqlTables": [
           {
             "table": "reviews",
             "postgresqlColumns": [
               {
                 "column": "listing_id"
               },
               {
                 "column": "id"
               },
               {
                 "column": "date"
               }]
           },
           {
             "table": "listings"
           },
           {
             "table": "calendar"
           }
         ]
       }
     ]
   },
   "excludeObjects": {},
   "replicationSlot": "datastream_demo_repl_slot",
   "publication": "datastream_demo_publication"
 }
The file declares –
a) replication slot
b) publication name and
c) Tables.
You can see that the table ‘reviews’ has specific columns mentioned that need to be replicated. This way, we can define the replication at the granularity of columns.
destination_config.json – Set up the following file in your project working directory. You can give any name to the file.
{

   "sourceHierarchyDatasets": {

     "datasetTemplate": {

       "location": "europe-west2",

       "datasetIdPrefix": "datastream_"

     }

   },

   "dataFreshness": "200s"

}
The file declares the BigQuery dataset prefix, location and the freshness that needs to be maintained. The data controls the latency in streaming the data from source.
airbnb_cdc_deploy.sh – Set up the following file in your project working directory. You can give any name to the file.
#! /usr/bin/env bash
set -e


# Function to check if the required variable have been  initialised
function check_vars() {
 for var in "$@"; do
   if [ -z "${!var}" ]; then
     echo "**  $var environment variable is not set"
     error_flag=True
   fi
 done
}


# Function to check the status of datastream operations
function check_datastream_operation_status() {
 local source_conn_profile_output="$1"
 local operation_name=$(echo "$source_conn_profile_output" | jq -r '.name' | awk -F/ '{print $6}')
 sleep 2
 local operation_status_output=$(gcloud datastream operations describe "$operation_name" --location=$REGION --format json)
 echo
 echo "$operation_status_output"


 if jq -e ".error" <<< "$operation_status_output" >/dev/null; then
   echo "***** Error encountered ******. Please check for the validation errors"
   exit
 else
   echo "Operation accepted successfully"
 fi
}


# Get secrets from secret manager
export DBPASSWORD=$(gcloud secrets versions access latest --secret=datastream_source_db_password)
export DBUSER=$(gcloud secrets versions access latest --secret=datastream_source_db_user)
export DBHOST=$(gcloud secrets versions access latest --secret=datastream_source_db_hostname)
export DBPORT=$(gcloud secrets versions access latest --secret=datastream_source_db_port)
export DBNAME=$(gcloud secrets versions access latest --secret=datastream_source_db_name)
export DBCERT=$(gcloud secrets versions access latest --secret=datastream_source_db_cert)


# Call function to check if required variables are set
error_flag=''
check_vars DBPASSWORD DBUSER DBHOST DBPORT DBNAME DBCERT REGION PROJECT SOURCE_CONN_PROFILE SINK_CONN_PROFILE STREAM_NAME
if [ -z "${error_flag}" ]; then
 echo "All the user environment variables are set"
else
 echo 'Check if the variables are set correctly'
fi


# Define connection profile for source
echo "Setting up connection profile for source ... "
source_conn_profile_output=$(gcloud datastream connection-profiles create $SOURCE_CONN_PROFILE --location=$REGION --type=POSTGRESQL --postgresql-password=$DBPASSWORD --postgresql-username=$DBUSER  --display-name=$SOURCE_CONN_PROFILE --ca-certificate=$DBCERT --postgresql-hostname=$DBHOST --postgresql-port=$DBPORT --postgresql-database=$DBNAME --static-ip-connectivity --format json)
check_datastream_operation_status "$source_conn_profile_output"
sleep 2


# Define connection profile for destination
echo "Setting up connection profile for destination ... "
dest_conn_profile_output=$(gcloud datastream connection-profiles create $SINK_CONN_PROFILE --location=$REGION --type=bigquery --display-name=$SINK_CONN_PROFILE --format json)
check_datastream_operation_status "$dest_conn_profile_output"
sleep 2


# Define stream using the profiles
echo "Defining stream using source and destination profiles.. "
stream_definition_output=$(gcloud datastream streams create $STREAM_NAME --location=$REGION --display-name=$STREAM_NAME --backfill-all --destination=$SINK_CONN_PROFILE --bigquery-destination-config=destination_config.json --source=$SOURCE_CONN_PROFILE --postgresql-source-config=source_config.json --format json)
check_datastream_operation_status "$stream_definition_output"
sleep 10


# Start the stream
stream_start_output=$(gcloud datastream streams update $STREAM_NAME --location=$REGION --state=RUNNING --update-mask=state --format json)
check_datastream_operation_status "$stream_start_output"


echo "Script ending successfully"
The script orchestrates the 3 phases we discussed above, defining source and destination connection profiles, then defines stream and finally starts the stream. Few things to note
- The check_vars function is declared to check if the required variables are set up in the environment.
- The required variables to involve the script are –
- GCP Region
- GCP Project
- Source connection profile name
- Sink connection profile name
- Stream name
- The check_datastream_operation_status function is declared to check the status of datastream async operations. If there are errors, the script will show the errors and fail.
- Extract the DB credentials user id, password, ca-cert, host name and database name from the secret manager.
- Validate the credentials and other variables by calling the check_vars function.
- Set up the source connection profile using gcloud CLI for datastream. Check for any errors by calling function check_datastream_operation_status
- Set up the destination connection profile using gcloud CLI for datastream. Check for any errors by calling function check_datastream_operation_status
- Set up the stream using the connection profiles and config files we have set up above.Check for any errors by calling function check_datastream_operation_status
PS: If you change the names of the above two config files (source_config/destination_config), make sure its updated in the script.
- Update the status of the newly created stream to RUNNING. Again check for any errors by calling function check_datastream_operation_status
Please note that the script is designed to run in a development environment.
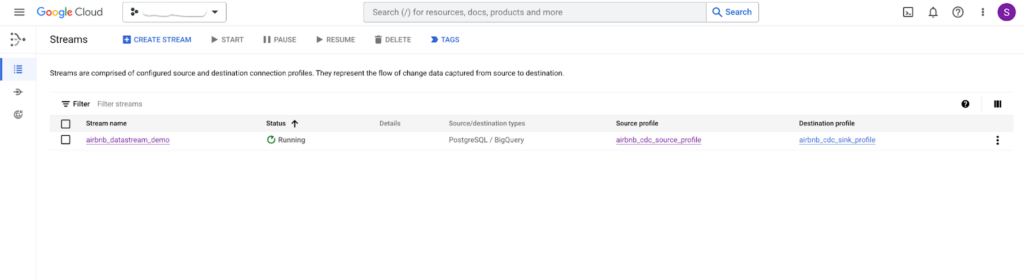
When you run the above script successfully, you should be able to see the stream running with status green 🙂
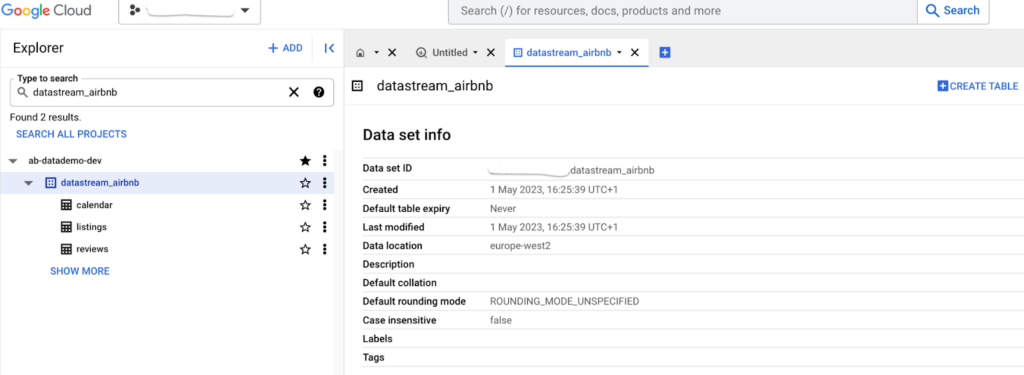
The above stream creates the schema in the BigQuery as shown below. Remember the destination_config declared datastream as prefix.
So here goes a streaming pipeline to get your OLTP cdc into BigQuery!
Understanding Serverless Change Data Capture: What happens next?
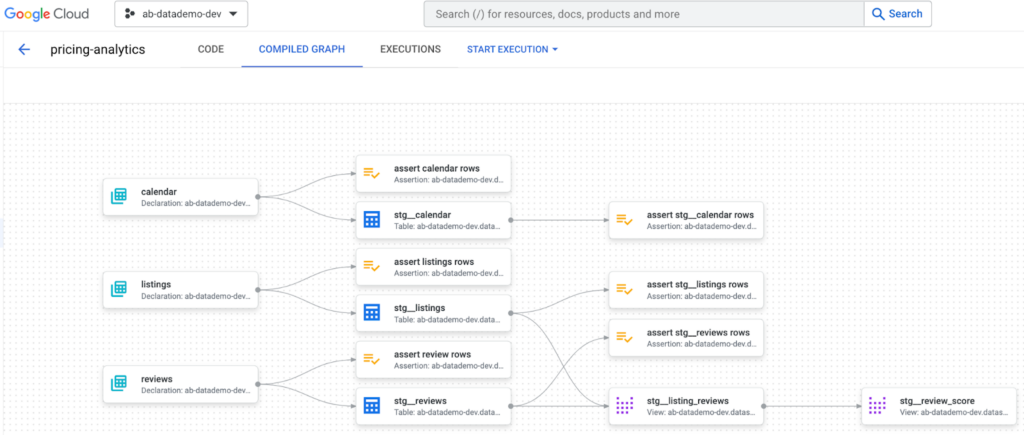
In the next part of this blog, we’ll build a dataform Pipeline which consumes the streamed raw data layer and applies the required transformations leveraging BigQuery storage and compute. The dataform execution graph compiled for the transformation workload could look like the one shown below. In addition, we’ll also cover the CI/CD aspects of the design and how the staging layer can be consumed for smart analytics.
Until then… Happy coding.
Thank you to Sophie Owen and Gordon Bryce from the Appsbroker data team for contributing to this this post.


