
What is a Dataflow template – and why might you need one? Read on to find out.
A Dataflow template is simply the Apache Beam Pipeline written in either Java or Python SDK. Templating the Dataflow job involves analysing the pipeline’s graph structure and storing the graph in either a metadata format or as a container image. The template can then be used to deploy the pipeline.
In addition to adhering to SoC (Separation of Concerns) principles, templating Dataflow jobs provides some distinct advantages:
- Bundling the dependencies as part of a template image reduces the deployment time significantly. Deploying my pipeline without a template took 40 minutes – reduced to just under five minutes using Flex Templates. This is incredibly effective for batch pipelines.
- Ability to validate input arguments before deployment, minimising runtime errors.
- Avoid needing to recompile the code for deployment.
- Adapt the pipeline deployment to the CI/CD principles.
- Ability for non-technical users to deploy the templates on-demand using REST APIs.
There are two kinds of templates: a) Classic Templates and b) Flex Templates.
You can find out more about Dataflow templates here.
Warning! It’s highly likely (in fact, almost guaranteed) that you’ll hit a wall if you follow the official documentation for deploying the Flex Template job with a good number of dependencies – or if you’re following a modular design. Ironically, it’s quite common for production-grade dataflow pipelines to follow a modular design pattern due to its flexibility and ease of maintenance.
It’s taken me a fair amount of time to troubleshoot the problems I faced during this process and figure out a clean way to create the Flex Templates – motivating me to write this piece!
First, I’ll explain the context, before going through the steps you need to follow to create your own Flex Templates.
The Context
Here’s a streaming pipeline which reads messages from PubSub subscribers, validates the schema of each message, and applies different window techniques i.e. FixedWindows, SessionWindows, and resulting PCollections written to the BigQuery table for analytical use.
As you can see, it’s a typical high velocity, high variant data pipeline. To view the image full-size, click here.

Creating a Flex Template for a streaming pipeline (Python SDK)
Step 1: Check your folder structure
Make sure you have the following folder structure for your pipeline. As you can see, I have two pipelines: a) ingestion pipeline and b) prediction pipeline.
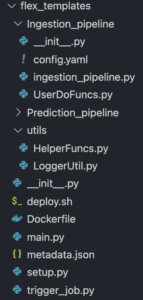
Both pipelines use common utility and helper functions i.e. HelperFuncs.py, LoggerUtil.py, which are placed in separate sub-folder called utils.
Config.yaml file has all the environment specific variable parameters i.e. subscriber name, Big Query table name, Vertex AI endpoints etc. Users will have to pass the environment name for example ‘DEV’ or ‘SIT’ or ‘PRE_PROD’ or ‘PROD’ as the input argument to pick up respective parameters from this config file.
You guessed it right! Yes, the ParDo methods used in the pipeline are coded separately. (UserDoFuncs.py). Ingestion_pipeline.py has the definition of a Beam pipeline.
main.py is the main function which invokes the ingestion pipeline. Here I’m deploying the ingestion pipeline.
metadata.json is the metadata file which holds the regex definition to validate the input argument (environment name) before deploying the pipeline. You can see the sample metadata file here.
Step 2: Make sure your setup.py is correct
We handle all the dependencies using the setup file. This is a very important step and differs from what the official documentation states.
packages=setuptools.find_packages() is especially important and you can see the list of dependencies here. Notice I missed apache-beam; the reason will become apparent very shortly!
At this point, we have everything ready to run the pipeline on DirectRunner. I strongly advise running the pipeline locally to avoid any surprises! My setup.py file looks like this:
import setuptools
package_list=['google-cloud-storage',
'google-cloud-logging',
'google-cloud-bigquery',
'google-cloud-aiplatform',
'google-api-python-client',
'google-apitools']
setuptools.setup(name='ingestion_pipeline',
version='1.0',
author='Dev',
author_email = 'dev@developer.com',
url='',
packages=setuptools.find_packages(),
install_requires=package_list,
)Step 3: Make sure your Dockerfile covers it all
The Dockerfile has all the instructions to create a container image for the pipeline. Here’s my Dockerfile. Referencing the setup.py in the Dockerfile is VERY important as it ensures the container places all the dependencies at PYTHONPATH.
Oh, you see some pip installs here? Yep, I had to code some of the dependencies separately. An explicit timeout is applied for Dataflow deployments. When we include these packages in the setup.py, the Dataflow engine takes a very long time to install these dependencies, resulting in a timeout error as detailed here. One of the main reasons for this latency is explained here.
Setting PIP_NO_DEPS to True will avoid pip recompiling any of the dependencies, saving you even more time.
FROM gcr.io/dataflow-templates-base/python3-template-launcher-base

RUN apt-get update
# Upgrade pip and install the requirements.
RUN pip install --no-cache-dir --upgrade pip
RUN pip install apache-beam
RUN pip install apache-beam[gcp]

RUN mkdir -p /dataflow/template
WORKDIR /dataflow/template

COPY ingestion ${WORKDIR}/ingestion
COPY setup.py ${WORKDIR}/setup.py
COPY main.py ${WORKDIR}/main.py

ENV FLEX_TEMPLATE_PYTHON_PY_FILE="${WORKDIR}/main.py"
ENV FLEX_TEMPLATE_PYTHON_SETUP_FILE="${WORKDIR}/setup.py"

# Since we already downloaded all the dependencies, there's no need to rebuild everything.
ENV PIP_NO_DEPS=True
Step 4: We’re finally there!
Everything is now ready! Invoke deploy.sh (do ./deploy.sh) to create a Flex Template, container image for the pipeline, and deploy the pipeline to Dataflow Runner.
Set the variables in the script (first four lines) according to your needs. I used the ‘eu’ container registry. You can use a global registry if needed.
gcloud dataflow flex-template build creates a Flex Template control file and stores it in the bucket against BUCKET_PATH.
gcloud builds submit creates a container image using the Dockerfile and pushes the image to the container registry.
The gcloud dataflow flex-template run command deploys the image to Dataflow Runner.
#!/bin/sh

# Set the variables
PIPELINE_NAME=ingestion_pipeline
BUCKET_PATH=#TODO Code your GCS bucket name to hold the template file
DF_JOB_NAME=ingestion-pipeline-flex-job    # Dataflow job name
CONTAINER_REGIS=eu.gcr.io         # Container Registry Service

export PROJECT_ID=$(gcloud config get-value project)
FLEX_SPEC_PATH=gs://$BUCKET_PATH/dataflow/flextemplates/$PIPELINE_NAME.json
FLEX_IMAGE=$CONTAINER_REGIS/$PROJECT_ID/$PIPELINE_NAME:latest

# Create a flex template definition file in the GCS bucket.
# This template is needed to submit the job via REST API or
# gcloud command.

echo $PROJECT_ID
gcloud dataflow flex-template build $FLEX_SPEC_PATH --image $FLEX_IMAGE --sdk-language PYTHON &&
echo Created flex template file at $FLEX_SPEC_PATH   &&

# Execute gcloud Build command to create Image for the streaming job
gcloud builds submit --project=$PROJECT_ID --tag $FLEX_IMAGE  &&
echo Created dataflow pipeline image : $FLEX_IMAGE   &&

# Deploy the flex image. Comment this statement if deployment is not required.
gcloud dataflow flex-template run $DF_JOB_NAME --template-file-gcs-location $FLEX_SPEC_PATH --region $REGION \
--parameters env='DEV' &&

echo "Deployed flex template Dataflow job"
Your content goes here. Edit or remove this text inline or in the module Content settings. You can also style every aspect of this content in the module Design settings and even apply custom CSS to this text in the module Advanced settings.

We can, of course, code the deploy.sh script commands into the Cloud build YAML file and create a CI/CD build pipeline, but I’ll leave that post for another day!
Found this article helpful? For more technical content written by our Google Cloud experts, click the button below to subscribe to Head in the Clouds today.


