
Get hands on with IAC and CI/CD in Google Cloud in this brief tutorial, Senior Platform Engineer at Appsbroker, Ferris Hall. Here, Ferris takes us through the basics in a short but detailed guide packed with tips and tricks.
If you’re reading this article, you may have already deployed some cloud resources, a couple of VMs, a custom VPC, or even a GKE cluster.
And if you’re wondering why you should bother with IaC (Infrastructure-as-Code) because clicking through the console seems easy and quick, then consider doing this for multiple VMs or a bunch of firewall rules for your VPC. In truth, it would be painfully slow and can introduce inconsistencies and human errors that automated processes would normally reduce.
My personal IaC of choice is Terraform. It is a declarative language expressed in HCL or JSON in which you configure your infrastructure to declare the state and what it should look like or how it should be configured. But why?
Deploying your infrastructure using IaC is repeatable, dependable and auditable. You can create modules so all your resources are deployed using the same code. Dependable, you can test and change your variables. Auditable, you can track changes using Git, even deployments using CICD pipelines.
What is IAM and Least Privilege?
Let’s start with Compute Engine. You may have noticed that when you create a Compute Instance, it’ll come configured as a default to use the project’s default Compute Engine service account, but not overly best practice or secure.
Instead, take a look at the IAM page and you’ll notice that the default Compute Engine service account comes locked and loaded with the “Editor” role. You can use that to do what you need to without the need for further config, but the editor role is overpowered and too broad for a VM that might just need access to a Cloud Storage bucket or maybe Cloud SQL.
To get into the habit of best practice, we should use IAM securely and only give Google Cloud Identities like users and service accounts IAM roles to access services, or do the jobs they need to. Nothing more.
That way, if the Compute Engine VM or the service account attached to it became comprised or mistakes during deployment happen, the blast radius is smaller and no unnecessary access can be leveraged.
What role does the Compute Engine VM play?
The Compute Engine VM, depending on what it is being used for, can be a web server. Here, we would create a dedicated service account that has the IAM role roles/storage.objectAdmin. This then allows the Compute Engine VM the permission to create, update and delete objects within Google Cloud Storage buckets.
Doing so ensures that the VM has no unnecessary IAM roles to do anything, or has access to anything that we don’t intend for it to do.
The practice of least privilege should be used for all IAM roles for identities and service accounts when creating Google Cloud resources. Read more on the IAM Google page.
What is a VPC Network?
While we’re looking at our Compute Engine VM, when you first spin one up you’ll probably attach it to a network as the default VPC. And we can level this up by getting rid of the default VPC network and creating a custom VPC network with subnets in the region we’re working in.
This controls what our subnet IP ranges are and what region we have our subnets created in. We can also get more control over the firewall rules and not have the default firewall rules available to use. We really don’t want to have firewalls that we don’t intend on using and we don’t want a “default-allow-ssh” firewall rule to all instances in our VPC that is available to 0.0.0.0.
Again, this all points to best practices and ensuring security by design, considering those security considerations when creating resources in Google Cloud.
How to deploy infrastructure on Google Cloud
When you hands on with IAC and CI/CD in Google Cloud, you’ll need a Google Cloud project to work on. Get started for free.
You’ll need to download and install the Terraform binary for your OS of choice. You’ll also need to be used to working in the terminal and you’ll need to create an empty working directory for your Terraform code.
In this example, we are going to be running as our own Google user identity but I’ll explain in future tutorials the benefits of service accounts and impersonation.
To start with, let’s tell Terraform how to interact with our chosen platform, Google Cloud.
In the root of our directory, we’ll create a providers.tf Terraform file, this tells Terraform that we’re using the Google Cloud Terraform provider since we’ll be creating Google Cloud resources:
provider "google" {}But we’ll add some configuration for our project here too, just the project and region for now, it saves us typing it in on all our resources later.
provider "google" {
project = "my-terraform-gcp-project"
region  = "europe-west2"
}
How do I add resources?
Next, we need somewhere to declare what we want to create in Google Cloud, these are referred to as resources. eg. A VPC network is a google cloud resource, a subnet in that VPC would be a separate resource and the VM that is attached to that subnet would be another resource etc. You get the picture.
Here is an example of a VPC and a subnet in a main.tf file:
resource "google_compute_network" "custom-vpc" {
name                    = "test-tf-network"
auto_create_subnetworks = false
}

resource "google_compute_subnetwork" "subnet" {
name          = "test-tf-subnetwork"
ip_cidr_range = "10.2.0.0/16"
region        = "europe-west2"
network       = google_compute_network.custom-vpc.id
}
That’s about 10 lines of code to create a VPC network and a subnet, which is pretty impressive.
There are more options and inputs we could add for an even more opinionated VPC and Subnet which is covered in Terraform’s very handy and helpful available provider registry documentation via the Terraform registry. This link is useful for when you really get going.
Planning and Applying
We now have our resources in our main.tf file ready to go, we need to plan our additions and then apply when we’re happy
To run our plan you need to enter the command terraform plan Terraform will then take a look at the resources in our Terraform files and it will also take a look at the state, now we haven’t really covered Terraform state in much detail yet. Later!
This is the really cool part, we are declaratively telling Terraform what we want our infrastructure in Google Cloud to look like.
In our case, we don’t have anything in the state as this Terraform is all new so we should see a plan of 2 to add. The VPC network and the subnet. Think of terraform plan as a dry run or what would this current code add, change or remove if I applied the changes in Terraform.
After running a plan we can now run terraform apply It will run a plan once more but will ask us “Do you want to perform these actions” Type yes and hit enter and all going well, the resources in our Terraform will be deployed in Google Cloud!
Additions and Changes
That’s our VPC and subnet running and configured in Google Cloud, but what if we wanted to make changes or even add some more resources? We can add something to our existing code, let’s add a Compute instance to run on our network.
As you get more hands on with IAC and CI/CD in Google Cloudhands on with IAC and CI/CD in Google Cloud, this is where the Terraform state comes in. You might have noticed a new file appear in your directory named terraform.tfstate this is the state file which represents our Google Cloud infrastructure in JSON.
Let’s add a web server VM and a firewall rule:
resource "google_compute_firewall" "web-fw" {
  name = "http-rule"
  network = google_compute_network.custom-vpc.id
  description = "Creates firewall rule targeting tagged instances"


  allow {
    protocol      = "tcp"
    ports         = ["80"]
  }
  target_tags   = ["web"]
  source_ranges = ["0.0.0.0/0"]
}

resource "google_compute_instance" "default" {
  name         = "tf-test-web-vm"
  machine_type = "g1-small"
  zone         = "europe-west2-b"
  tags         = ["web"]

  boot_disk {
    initialize_params {
    image = "debian-cloud/debian-11"
    }
  }

  network_interface {
    subnetwork = google_compute_subnetwork.subnet.self_link
    access_config {
      // Ephemeral public IP
    }
  }
  metadata_startup_script = file("./startup.sh")
  service_account { scopes = ["cloud-platform"]
  }
}
When we run teraform plan again it will check the terraformstate.tf file for what already exists and notice the difference is the new compute instance resource and the firewall resource, it will then proceed to add the 2 new resources when we run a terraform apply
Making our Code Declarative
We are declaring to Terraform what we want our infrastructure to look like and how it’s configured.
If we didn’t add any new resources to our code and ran a plan or apply then Terraform would inform us that everything looks as it should according to the terraformstate.tf file.
Now if someone went into the console and decided to add another port to our firewall when we run apply again it would notice that it hasn’t been declared in the terraform files, our main.tf in this example and would remove it leaving just the configured port 80. So it works by removing configuration and resources too.
Destroying
Lastly, to wrap up, let’s get rid of any resources that you’ve created so you don’t get charged for them. Running the command terraform destroy will offer if you are sure you want to destroy the resources as this cannot be undone.
Experimenting with Terraform is a great way to hands on with IAC and CI/CD in Google Cloud. This is pretty much the standard for deploying infrastructure at the moment and is such a valuable skill to have experience with.
I have a repo which the code that I used for this tutorial which you can find here.
What is a pipeline and why does it matter?
Disclaimer: This demo is intended to get you using a pipeline to deploy Terraform quickly and demonstrate the benefits. It is not recommended for production.
You’ve probably heard the term pipeline and CI/CD. A pipeline is usually part of the CI/CD process. CI/CD is the continuous integration of developer code and when that code has been developed and merged it is then deployed into the working environment. continuous building, integration, testing and deployment.
Running our Terraform in a pipeline makes it more transparent and collaborative. No more wondering who is pushing to what and running Terraform from their laptop. It also ensures the tasks running are running in a consistent environment, the same version of providers, Terraform etc.
We’ll look at the different parts of what makes our pipeline and how we get it to run successfully.
How do I build a pipeline?
First, create a new project which you don’t mind deleting afterwards. If you’re unable to, just make a note of everything you add ad create so you can delete it when you’re done to avoid any costs or security implications.
As you get hands on with IAC and CI/CD in Google Cloud, make sure Cloud Build is enabled. Then we’ll give the cloud build service account the editor IAM role for this demo purpose. In real-world circumstances you’d need to be using least privilege IAM, using a dedicated service account to deploy Terraform and only the IAM roles that it needs. Please note: This is best practice. In real-world projects, you should use least privilege when assigning IAM roles.
We’ll need also to add the build yaml files that will tell Cloud Build what tasks we want to run. You can find it here.
How do I create a GCP Build Trigger?
First, you need to connect Cloud Build to our GitHub repo so it can map and allow builds.
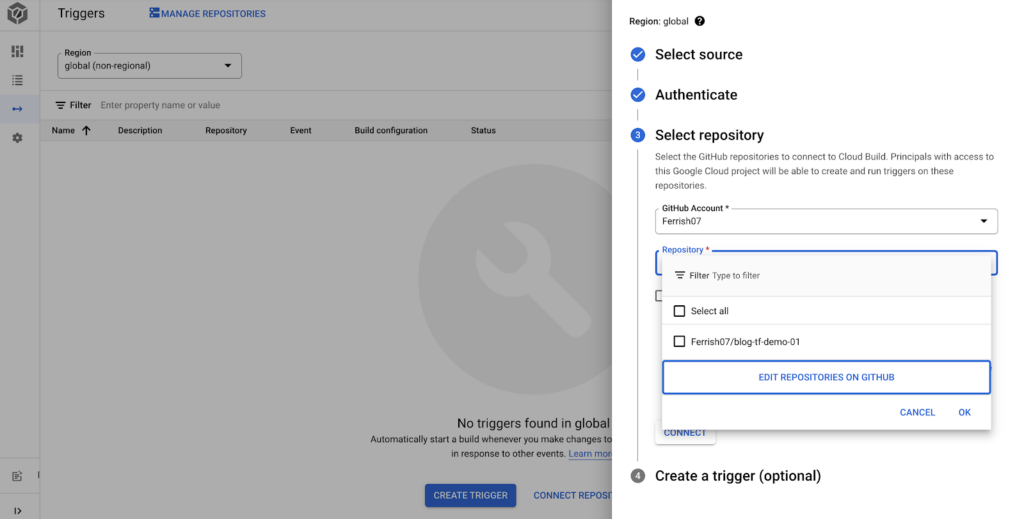
Then configure our trigger to run our Terraform plan when we create a pull request to the main branch, the build config will point to the terrform-plan.yaml file we created earlier.
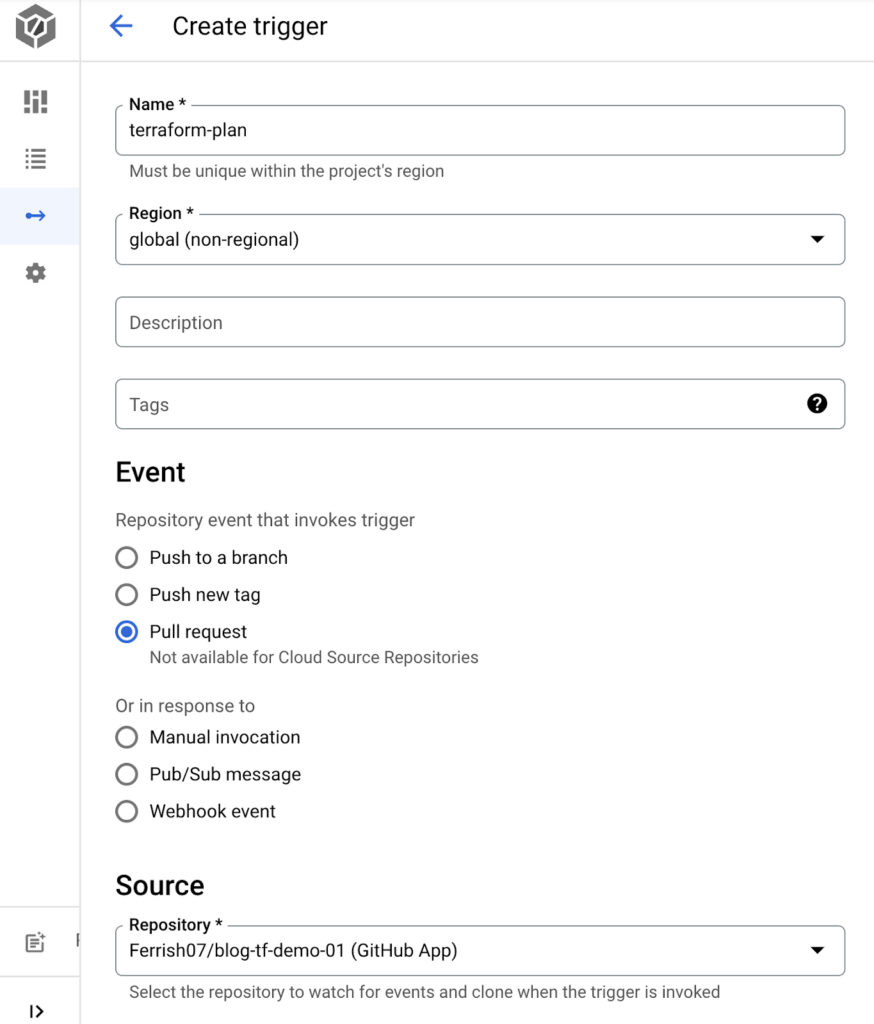
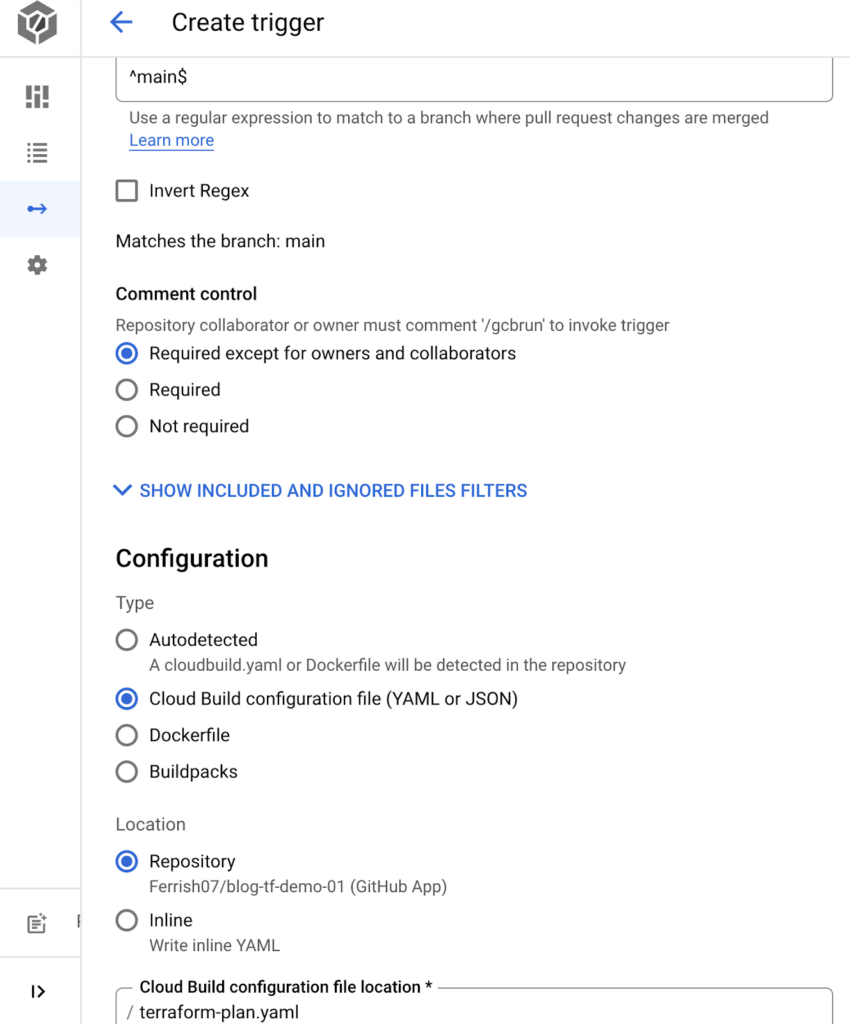
Create one for running terraform apply. The difference in this trigger will be “Push to a branch” as this trigger needs to invoke when the pull request has been approved and merged into the main branch.
So, let’s push to our feature branch. We can make an arbitrary change, like changing the name of the VM. Commit and push to our feature branch and create a Pull Request.
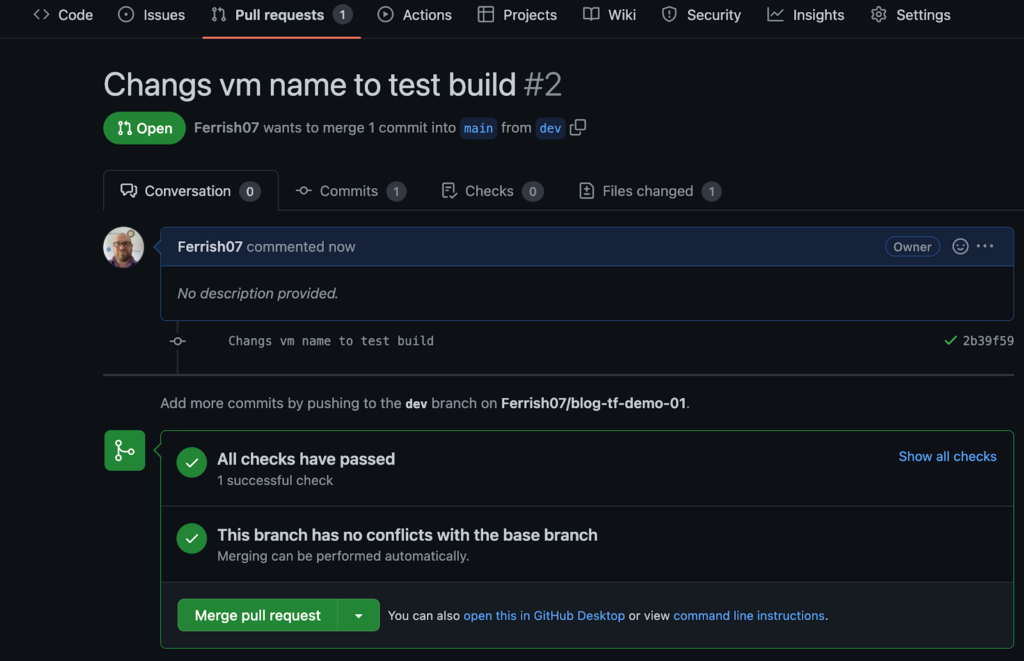
At this point, our build has been triggered and the Terraform-plan trigger is running, it will also appear as a check. If the check fails, if the Terraform plan fails for whatever reason, we won’t be able to merge our “broken” code to the main branch. So adds a good safety net to our repo.
Our Terraform plan should pass with resources to add, we can now merge to main which will effectively push to main and trigger our Terraform-apply Cloud Build trigger and apply our Terraform.
We can check the progress of the build from the Cloud Build log output from the Cloud Build dashboard and watch for any errors.
Build Success and Clean Up
If you’ve read this far, hopefully, you’ve just automated your Infrastructure-as-Code. Congrats! It seems like a lot to do to effectively just run terraform apply, but you should start to see the benefits of deploying your infrastructure in a more automated way.
Don’t forget to delete any service accounts, and service account keys, and remove any editor IAM roles if you’re using a project you intend on keeping. Or to be safe just delete your project.
Ideas for improvement
Now you can see where a pipeline and automating your IaC deployments can be beneficial. However, there are a few security implications with this method and some security considerations you should make when taking this to a real-world and production-grade environment.
Use a dedicated service account for Terraform, adding the Cloud Build default service account to the editor role is not a good idea, it’s too broad an IAM role and everyone with the right role can use it. You could also use that service account to trigger your builds instead of the default Cloud Build service account.
There are some additional logging options that need to be added to the cloudbuild.yaml files. Or, you can use account impersonation as part of your cloudbuild.yaml. could build acting as your Terraform service account. More on account impersonation here.
How would I use a Remote state?
In this demonstration our state was not persistent, we let Cloud Build run terraform init locally, meaning we would have lost the terraform state file when the Cloud Build container environment ended.
We should have created a GCS bucket and added a backend.tf file to tell Terraform to store the state file in our remote GCS bucket. if we wanted to make any changes or destroy, we had no reference to state. For you more eagle-eyed readers, yes I did accidentally commit the name of a service account and project ID. They are long gone now and absolutely not a good idea to commit to a public repo.
Some pre-commit hooks could have probably saved me from the embarrassment, and there are some really good ones for Terraform projects. In this event, as in so many others, Google search is your friend.
Any comments? Please let me know. I’m always interested in hearing stories about getting hands on with IAC and CI/CD in Google Cloud, including different approaches to pipelines and deploying infrastructure. There are really so many different ways, approaches and opinions to this, all with different weighted pros and cons.


